Quick Start Guide A124F Terminal
Created by Dave McMaster, Modified on Thu, 18 Jun at 10:07 AM by Dave McMaster
Introduction
Thanks for purchasing your new A124F Clocking in System. The following instructions will explain how to get started with the terminal, accessing the menu system, enrolling staff and connecting to your network. Please be aware that not all enrolment features may be available depending on which version you have purchased. You should have already received a welcome email with a link to your software instance and the guide ‘Getting Started With Evotime’. If you haven’t received this, please give us a call on 0113 2587856.
TABLE OF CONTENTS
- Introduction
- Parts List
- Wall Mounting
- Setting up the A124F Terminal
- Accessing the Terminal
- Enrolling a User
- Setting up Privilege Settings
- Clocking In and Out
- Connections
- Frequently Asked Questions
- Further Assistance
Parts List
Wall Mounting
When considering mounting the terminal, first choose a suitable position on a flat wall. The recommended installation height is around 140cm from the floor but adjust as necessary to suit your staff height.
CAUTION: Before drilling, check for hidden electrical cables, water or gas pipes in the wall. Take care to avoid them.

Setting up the A124F Terminal
Please note that a default Admin password has been set up for terminal security. You can set up your own additional Admin accounts later, but we advise leaving the default one in place, just in case you accidentally lock yourself out. It is advisable to enrol staff on the software first and then move onto the terminal. That way all clockings will be received. Also please ensure that each employee clocking ID in the software matches the User ID in the terminal.
Accessing the Terminal
Once the terminal has powered up fully tap the screen in the centre twice to bring up the ‘settings cog’ on the bottom left side of the screen.

Next tap the 'settings cog' and an icon 'Manager?' will appear near the top centre of the screen.

After this tap the screen in the centre again to bring up a 'padlock' icon on the bottom right.
Then tap the 'padlock' icon and enter the user id - '7856' & 'OK'.
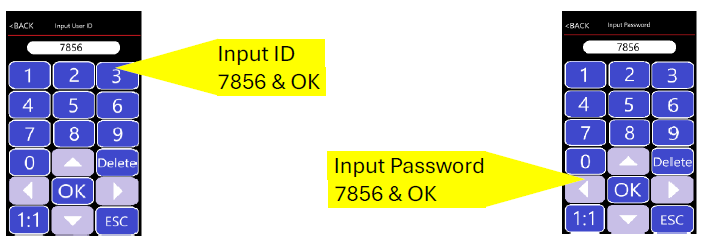
Finally enter the password - '7856' & OK to give you full access to the menu.
Enrolling a User
To begin enrolment first add a user. After a user has been set up the option to upgrade their privilege to either 'Admin' or 'Sup.User' can be selected. This will be further explained in the section Setting up Privilege Settings.
| From the main menu tap ‘User Mgt’
|
| Next tap ‘Add user’
|


The next available ID will be displayed, or you can input any number you like such as a payroll number. This ID number will be referred to in your software (clocking ID)
Tap in the Name box and type in the staff name followed by OK
|
|
A Department box can be filled in if desired
Next tap ‘Add User’ and depending on your terminal specification choose either Face, Fingerprint, Card or Password as enrol option, or any combination
|

Follow the onscreen prompts for the input method. Tip: When enrolling fingers, you have the option to enrol more than one, but when asked to enrol each finger will require 3 separate presses of the same finger. Try to be consistent each time with firm presses. If problems with a particular finger, try a different or multiple fingers. Also try briefly rubbing your finger on your forehead if dry.
Once Complete press the back button to User Mgt screen. The default enrolment will be as a standard user.
Setting up Privilege Settings
There are three levels of Privilege.
1, User – The default setting when enrolling a staff member. A User can only clock in and out.
2, Sup User – Has authority to enrol, edit or delete standard Users only and cannot access other terminal settings.
3, Admin – Has full access to all settings on the terminal and can enrol, edit or delete other Admins, Sup Users or standard Users.
| In ‘User Mgt’ menu tap ‘User view’and scroll to and select the desired user to be set for Admin rights by tapping their name
|
| After this tap in the box next to ‘Privilege’ and choose either Admin, Sup.User or leave as User |


Once finished you can back out to the User Mgt’ menu and continue enrolling staff or back out to the home screen.
TIP: When accessing the menu as an administrator you can use your face, finger, card or password, depending on your terminal version and which enrolment method you have set up. If you are using face then briefly stand out of the camera view (to avoid clocking) until the Manager symbol is displayed, as described in the section Accessing the terminal.
Clocking In and Out
The procedure for clocking depends on the method of enrolling for each staff member.
For face, just tap the display and then look into the screen.
For finger, just place the correct finger on the finger sensor.
For card, tap the card on the card symbol.
For password, tap the screen twice, then the padlock, type in user id & OK and then the password followed by OK.
Connections
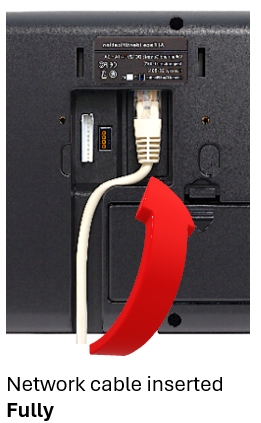
Ethernet
We always recommend using a network cable for a stable connection, if possible. If you are plugging in a network cable, then your terminal should be ready to connect to our software. If you have any connection issues, check out our FAQs at the end of this guide. You can carry on using the terminal to enrol and clock staff in and out. The terminal will hold literally thousands of clockings.
Wi-Fi
If you can’t use a network cable, then Wi-Fi is an alternative. Just make sure that you have a strong Wi-Fi signal at the terminal. Also please note that only 2.4Ghz Wi-Fi is supported.
If you want to connect by Wi-Fi, firstly log into the terminal as an Administrator.
Next tap on ‘Comm set’
|
|
After this, tap’ Wi-Fi’
|
|


| Then tap search to find available Wi-Fi connections |
| Choose the desired connection
TIP: Ensure that at least 3 green bars are displayed to avoid connection problems |


Finally type in the Wi-Fi password and tap OK. Again if you encounter issues connecting then check out the FAQs at the end of this guide.
USB Connection
Another option if you do not have access to an internet connection or Wi-Fi is to physically download clockings from the terminal using a USB flash drive. To do this follow these steps:
Firstly, log into the terminal as an Admin (as described in the section ‘Accessing the Terminal’).
From the Main Menu tap ‘Data Mgt’ and then insert a USB flash drive into the bottom left of the terminal.
|
|
Next tap on ‘Down all Glog’ and wait for the download to complete.
|
|


You now have all your clockings on the USB drive ready to upload to the software.
Frequently Asked Questions
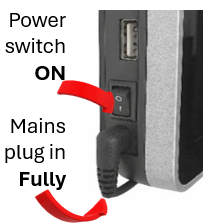
Q. Why won't the terminal turn on? Please check:
If the problem persists, please contact our Support team as detailed below. |
|

Q. Why did the terminal turn on briefly and then switch off? Please check:
If the problem persists, please contact our Support team as detailed below. |
|
Q. Why is the terminal not communicating with Evotime? Please check:
If your organisation has an IT department, ask them to confirm:
If the problem persists, please contact our Support team as detailed below. | |
Further Assistance
Your terminal should now be set up ready to use, but if you require further assistance or just have some more questions, feel free to reach out to us by emailing help@clockingsystems.co.uk. Just include the terminal name and software (A124F & Evotime) in the subject field. You can give us your name and company contact details in the main body of text, along with your query. We will get right back to you for help.
Was this article helpful?
That’s Great!
Thank you for your feedback
Sorry! We couldn't be helpful
Thank you for your feedback
Feedback sent
We appreciate your effort and will try to fix the article